
iPhone Tips Every Beginner Should Know
Your iPhone can do a lot—but you do not need to learn everything at once.
If you are new to using an iPhone, begin with a few features that can make everyday tasks easier. These tips can help you find the right instructions for your phone, locate things faster, make your screen more comfortable to read, manage interruptions, and feel more confident using your device.
One important thing to know before you begin: Not every iPhone works exactly the same way. The steps you follow may depend on which model you have—especially whether your phone has a Home button.
The names and locations of some settings may also vary slightly depending on your iPhone model and software version.
1. Find Out Which iPhone You Have
Knowing which iPhone model you have can make it much easier to find instructions that match your phone.
To check your model:
Open Settings.
Tap General.
Tap About.
Look for Model Name.
You may see something like iPhone 13, iPhone 15 Pro, or iPhone SE. You can write this down or take a screenshot so you do not have to remember it.
Once you know your model, include it when searching online for help. Instead of searching for:
How do I take a screenshot on an iPhone?
try searching for:
How do I take a screenshot on an iPhone 13?
You can use the same pattern for other questions:
How do I make the text larger on an iPhone SE?
How do I close an app on an iPhone 14?
How do I turn off notifications on an iPhone 12?
How do I restart an iPhone 15?
Adding your model helps the search engine show instructions that are more likely to match the buttons and gestures on your phone. When possible, look for instructions from Apple Support or another source you recognize and trust.
Apple also provides instructions for identifying your iPhone model.
Does Your iPhone Have a Home Button?
One of the biggest differences among iPhones is whether they have a Home button.
The Home button is the round button located below the screen on some older iPhones and iPhone SE models. If your phone does not have this button, you will use swiping gestures for some of the same actions.
This difference affects several everyday tasks, including returning to the Home Screen, opening Control Center, switching between apps, and taking screenshots.
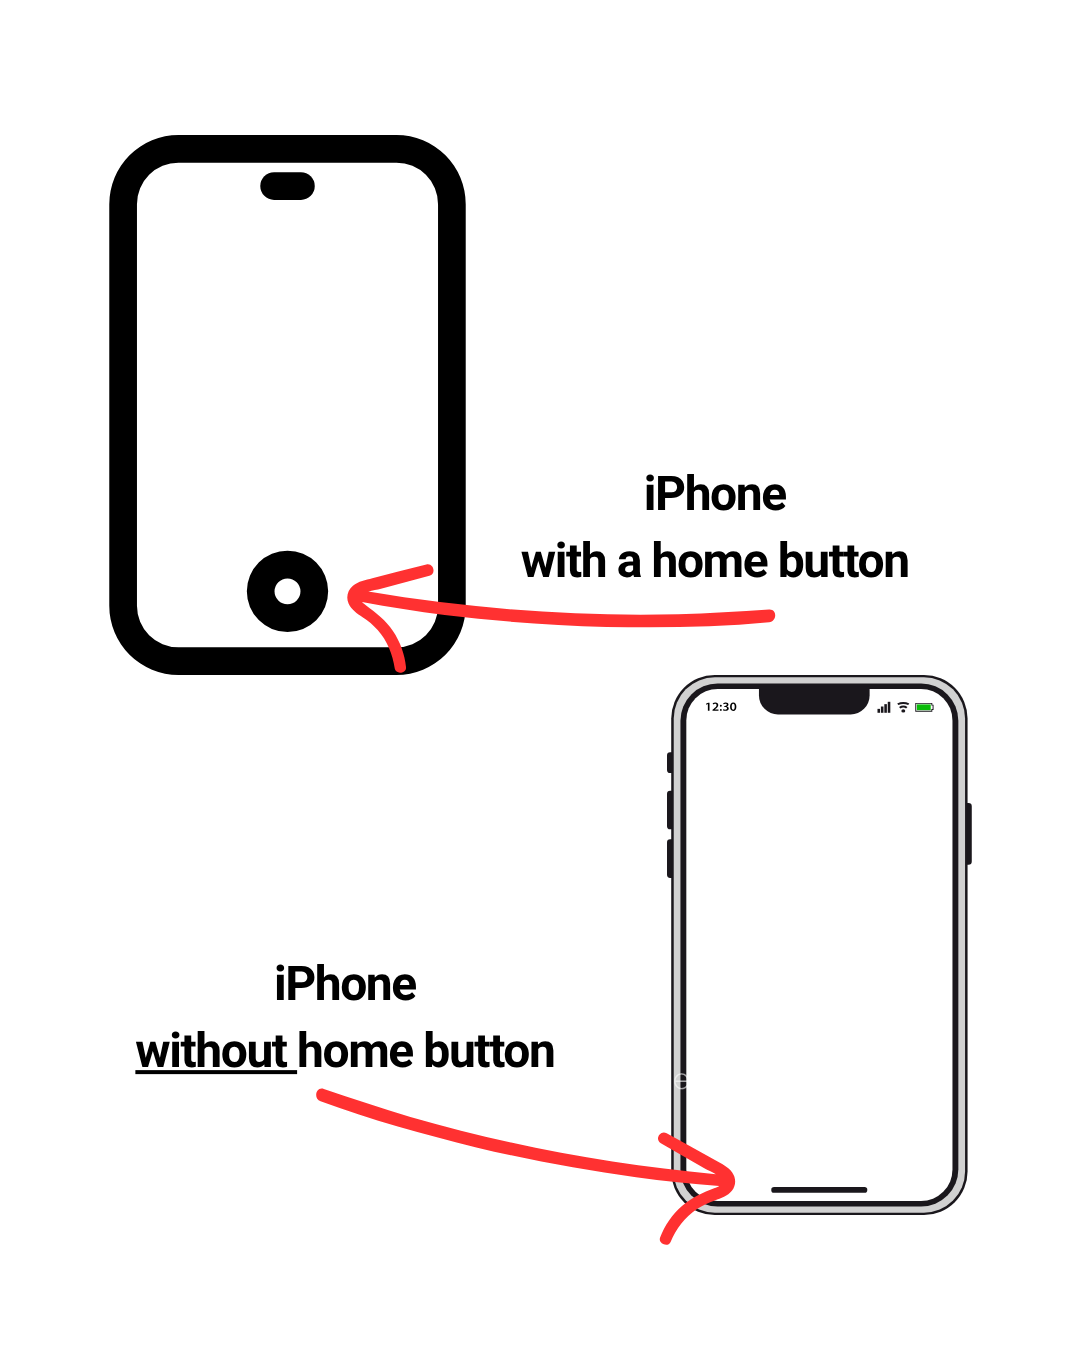
iPhone with a Home button
Round button below the screen
Press the button to return to the Home Screen
Swipe up from the bottom edge to open Control Center
iPhone without a Home button
Screen extends to the bottom of the phone
Swipe up from the bottom edge to return to the Home Screen
Swipe down from the upper-right corner to open Control Center
2. Set Up “Find My” Before You Need It
The Find My feature can help locate your iPhone if it is misplaced, lost, or stolen—but it needs to be turned on ahead of time.
To check it:
Open Settings.Look at the top of Settings. If you see “Sign in to your iPhone” instead of your name, the phone is not currently signed in to an Apple Account. If you see someone else’s name, it may be connected to that person’s account. In either situation, consider asking someone you trust for help before signing in, signing out, or changing the account settings, since those changes can affect photos, contacts, backups, purchases, and other information.
Tap your name at the top of the screen.
Tap Find My.
Tap Find My iPhone.
Make sure the available finding options are turned on.
It is also helpful to know the email address and password associated with your Apple Account. Store that information securely rather than keeping the password in an unlocked note on your phone.
Taking a few minutes to check these settings now can save a great deal of stress later.
3. Search Instead of Hunting Through Your Apps
Can’t remember where an app is? You do not have to search every page of your Home Screen.
From the Home Screen, swipe down from the middle of the screen to open Search. Be careful not to begin at the very top edge of the screen, which may open your notifications instead.
Tap the search box and type what you are looking for, such as:
The name of an app
A contact
An email or text message
A setting
A nearby business
Search can also do quick calculations, show weather information, and help you find information online. It is often the fastest way to find what you need—even when you know the app is somewhere on your phone.
When you are finished searching:
If your iPhone has a Home button: Press the Home button to return to your Home Screen.
If your iPhone does not have a Home button: Swipe up from the very bottom edge of the screen.
You may also see Cancel beside the search box. Tapping it will close the search.
It is a simple step, but not always an obvious one!
4. Make Text Easier to Read
If the words on your screen feel too small, you can make them larger.
Open Settings, tap Display & Brightness, and then tap Text Size. Move the slider until the text feels comfortable to read.
You can also tap Display Zoom to make buttons, icons, and other items appear larger. Additional options—including bold text and higher contrast—are available under Settings > Accessibility > Display & Text Size.
You can adjust these settings and see how they look. If you do not like the result, you can return to the same menu and change them again.
Adjusting your display is not “cheating.” Your phone should work for you, and small changes can make it much easier to use. Apple provides more information in its guide to adjusting iPhone display and text settings.
5. Use Control Center for Common Tools
Control Center gives you quick access to features you may use often, including:
Screen brightness
Volume
Wi-Fi
Bluetooth
Airplane Mode
Flashlight
Calculator
Camera
How you open Control Center depends on your phone:
If your iPhone has a Home button: Swipe up from the bottom edge of the screen.
If your iPhone does not have a Home button: Swipe down from the upper-right corner of the screen, near the battery symbol.
To close Control Center:
Tap an empty area of the screen;
Press the Home button if your phone has one; or
Swipe up from the bottom edge if your phone does not have a Home button.
You can also choose which tools appear in Control Center. On newer software versions, open Control Center and touch and hold an empty area to see options for adding, removing, or rearranging controls. If those options do not appear on your phone, open Settings, tap Control Center, and look for the controls you can add or remove.
Apple’s Control Center instructions provide more detail.
6. Take a Screenshot
A screenshot saves a picture of whatever is currently displayed on your phone. It can be useful when you want to:
Save a confirmation number
Remember an error message
Ask someone for help with what you see
Keep directions or other information handy
Share something that appeared on your screen
The buttons you use depend on your phone:
If your iPhone has a Home button: Quickly press and release the side or top button and the Home button at the same time.
If your iPhone does not have a Home button: Quickly press and release the side button and the volume-up button at the same time.
Try to press both buttons at the same time and release them quickly. If you hold them too long, your phone may open a different menu instead.
After you take the screenshot, a preview may appear in the lower-left corner of your screen or open in a larger editing window. Tap the preview if you want to:
Crop the image
Draw or write on it
Highlight something important
Cover personal details before sharing it
When you are finished, tap Done to see options such as saving the screenshot, copying and deleting it, or deleting it altogether.
If you do not need to make changes, you can swipe the small preview off the screen or wait for it to disappear. The screenshot will be saved in the Photos app automatically unless you choose to delete it.
Remember that a screenshot is a picture, not a live page. Links in it will not work, and information such as event details or prices may later change. If you need current information, return to the original website or app.
7. Manage Notifications That Distract You
Notifications can be helpful, but too many alerts can make your phone feel overwhelming.
To change notifications for a particular app:
Open Settings.
Tap Notifications.
Scroll through the list and tap the app you want to change.
Decide whether the app may send notifications and how those notifications may appear.
Depending on the app, you may be able to turn off sounds while continuing to receive visible notifications. You may also be able to stop notifications from appearing on your Lock Screen while still seeing them elsewhere.
You do not need to allow every app to interrupt you. Consider keeping alerts for things that may require timely attention—such as calls, messages, calendar reminders, or banking activity—and limiting notifications from games, shopping apps, and other services you do not need to hear from immediately.
When you want a temporary break, you can also use Focus or Do Not Disturb to quiet notifications. Before turning one on, check its settings to choose which people and apps may still reach you—especially family members, caregivers, or anyone who may need to contact you urgently. You may also be able to allow repeated calls, so a second call from the same person within a few minutes can come through. When a Focus is active, look for a Focus icon, such as a crescent moon, near the top of the screen or in the Control Center—and remember to turn it off when you no longer need it.
Apple explains how to choose which notifications a Focus allows or silences.
8. Press and Hold to Discover More Options
A quick tap opens something. Pressing and holding often reveals additional choices.
“Press and hold” means placing your finger on an item and leaving it there for a moment instead of lifting it immediately.
For example, you may be able to press and hold:
An app icon to see shortcuts or remove the app
A photo to copy, share, or save it
A link to preview the webpage before opening it
A message to react or reply to it
A Control Center button to see more settings
If you are unsure what an icon or item can do, try pressing and holding it. Simply seeing the menu will not select one of its options.
If you do not want to make a selection, tap somewhere else on the screen to close the menu.
Start With One Tip
You do not have to memorize every gesture, setting, or feature to use an iPhone successfully. Start by finding your model and noticing whether your phone has a Home button. That information can help you choose the right instructions whenever you need assistance.
Then choose one other tip from this list and practice it a few times. Once it feels familiar, try another.
Confidence with technology is not about knowing everything. It grows when you learn how to find the right information, adjust your device to fit your needs, and recover when something does not go as planned.
Want more opportunities to build your digital skills? Explore Wright to Learn’s upcoming classes for practical, learner-friendly guidance on smartphones, online safety, artificial intelligence, and more.
